
Teaching students to identify the main ideas in a text is sometimes hard. The more explicit we can be, the better students will catch on. My key strategies for teaching main idea include the following…
- Stating clearly what a main idea is (and how there can be more than one in a text)
- Stating why understanding the main idea is helpful
- Stating how to find the main idea – with an analogy to a framed photograph (or a screen saver photo on my phone) and an anchor chart for students to reference
- Engaging in an I DO & WE DO and then gradually releasing responsibility across lessons with multiple texts.
What follows is a description of a three-phase lesson we gave in Waukee, Iowa – a BIG THANK YOU to my colleagues there who helped me design and teach this lesson! BTW – ON TEXT SELECTION – locate a section of the text that reveals a main idea. I wouldn’t start with a whole text unless it’s short! Identifying the main idea in a section supports students in identifying ideas in the text as a whole.
Phase 1 Meet the Source
The teacher introduced the short book Flying Spies (Pioneer Valley Explore the World Series) and let the students just read and enjoy the book. As the students read, the teacher engaged individuals in reading conferences. Afterwards, the teacher posed a higher level thinking question and they discussed.
Phase 2 Meet the Strategy – “Using the Framed Photo Analogy to Identify Main Idea”
After the teacher taught phase 1, I taught the phase 2 lesson. I introduced the vocabulary word “trained” – clearly defining, giving an example sentence and then asking the students to use the word in the sentence. Understanding this word would help us later when we closely read an excerpt.
Then I explained the what and why of identifying main ideas. (This language is in a ONE PAGE GUIDE I created along with detaiils about how and suggestions for lessons.)
Next I presented the framed photo analogy and a framed photograph of their teacher with a special person in her life. (Click to see more details about how to present this analogy.)
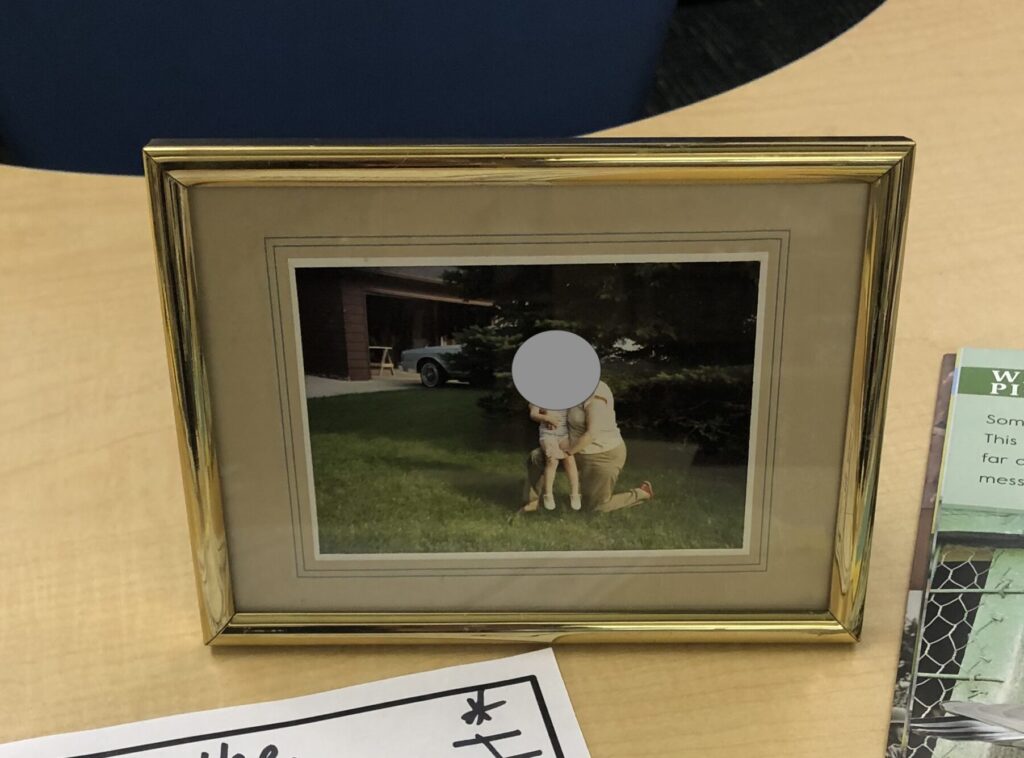
I started by asking the students, What do you notice? They identified the teacher, the special person, where they were, how they were leaning into each other as though they care about each other. I followed with the question, So why do you think your teacher framed this photo? They developed some main ideas like this photograph represents a special relationship in her life, this reminds her of a remarkable event or experience, this helps her remember an outstanding person she was close to.
Then I stated explicitly what they’d done to get to a main idea: We call what you just did “synthesis.” You looked at all of the details in the photograph and thought about how they are connected. You used the details you noticed and your background knowledge to infer this information. Then you thought about why this photograph is important enough to frame and put in a special place. When we read, view or listen to a source to identify a main idea, we engage in the same process. We notice the key details, think about how they are connected and then that connection can reveal a main idea.
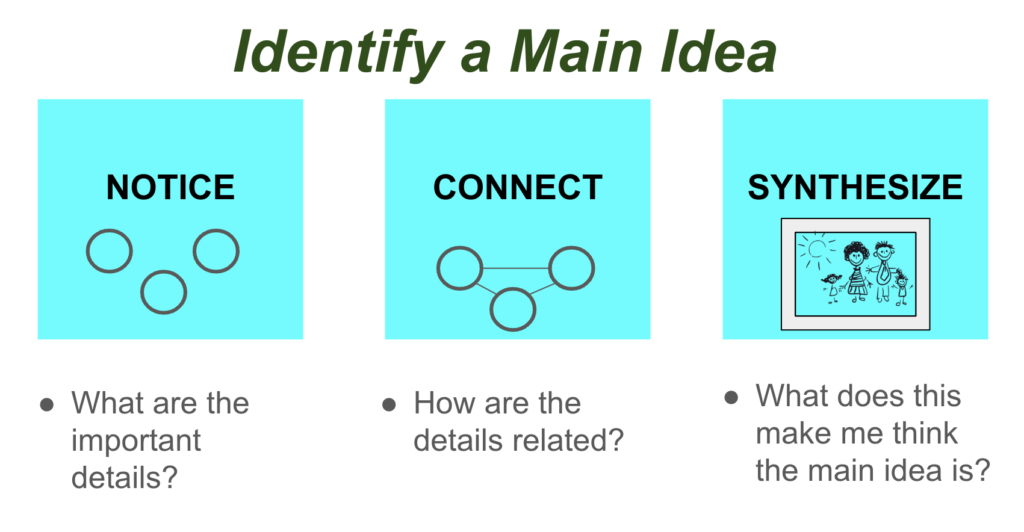
Since I taught this lesson (awhile ago), I’ve started using a three-step anchor chart to make this even clearer to students. Here’s a link to the sample anchor chart below.
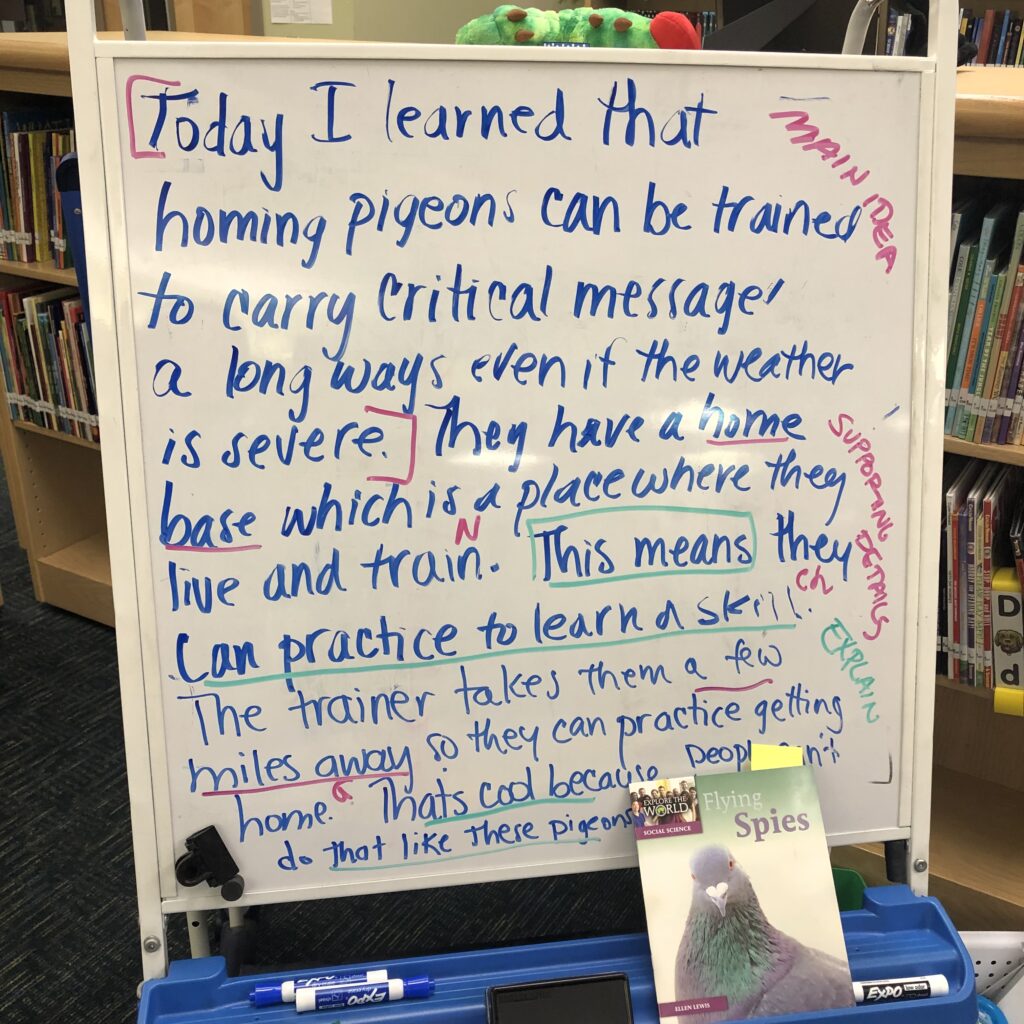
That’s just the introduction! Then we returned to Flying Spies and read the section “What are Homing Pigeons?” (Coming up with a main idea for the whole book or article is a LOT for some students; I always start with a section.) Next we started a close reading looking for key details that would lead us to the main idea. Notice my handwriting in the frame in the image of our synthesis below. During my idea, I thought aloud (I DO) about the firs three sentences and decided that “trained to carry” was an important detail that might help me synthesize and identify a main idea. Then I drew the students into a WE DO; we read one sentence at a time, discussed and decided if there was a detail that might be important. We continued with the WE DO until the last sentence when I asked the students to read and write a detail on their own (YOU DO) – those are the sticky notes you see. During the following lessons (with a different section or text), more and more responsibility should be left to the students!
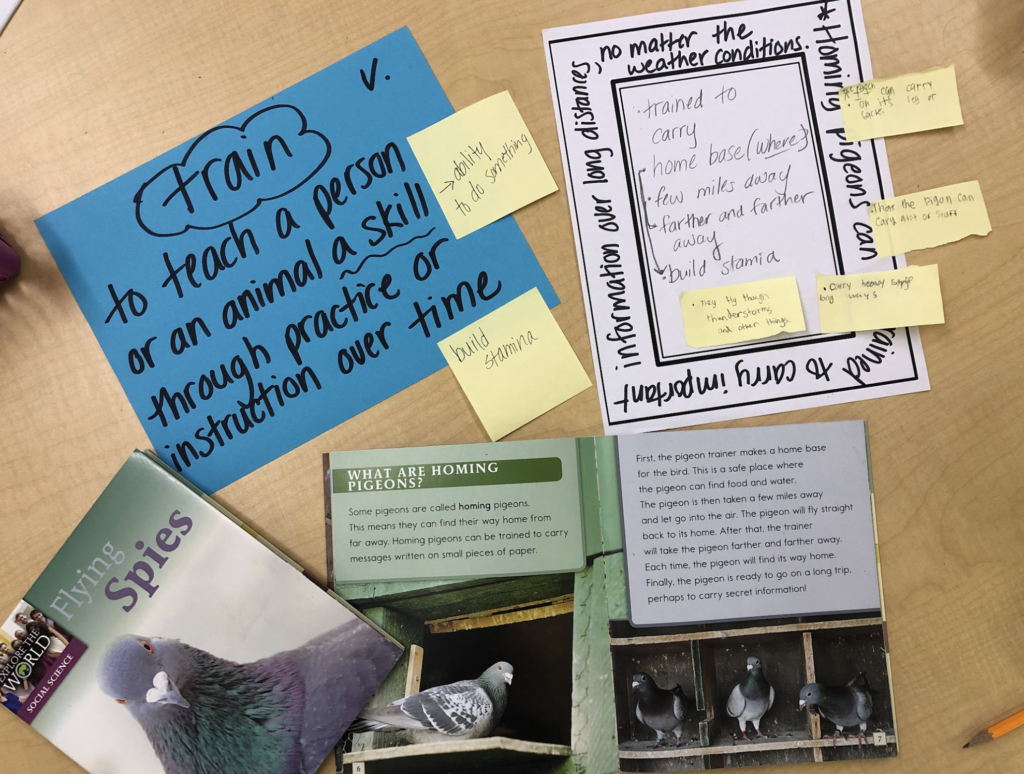
When we finished, we engaged in a WE DO and looked at the key details and began to think about what the main idea was. I recommend returning to the anchor chart and asking questions like How are these detaiils connected? Together, what do they reveal? What do they show that is important? You can see the main idea statement written in the frame. In follow up lessons, students should have their own frames (YOU DO or YOU DO TOGETHER) and be responsible for writing their own main ideas (with support as needed). An ALTERNATIVE lesson would be to give the students the main idea at the start so that you’re easing the cognitive load; they can focus on the details and see more easily how they come together. (This may have been the case in this lesson in Iowa – can’t remember ;).
I closed by asking them to review EXPLICITLY WHAT WE DID TO FIND THE MAIN IDEA. Use the anchor chart as a visual.
Phase 3 Meet the Response
For this lesson, we used our notes in the printed frame to help us write a shared response (WE DO). See image below. AGAIN – in follow-up lessons, students need to write responses on their own (YOU DO).
Resources
As shared earlier, this is a ONE PAGE GUIDE I created with the what, why, and how plus a description of how you can gradually release responsibility (I DO, WE DO, WE DO, YOU DO, YOU DO, YOU DO!!!) over several lessons.
Teaching main idea is not easy and students need LOTS of opportunities to work on this. If they continue to struggle, I’ve written several blog entries on that might be helpful.
- Give students the main idea up front and then let them grapple with identifying and explaining key details. Lots of experiences with already identified main ideas can help them begin to notice main ideas on their own.
- Unpack a main idea statement to help students explain a main idea better. Write the statement on piece of chart paper, discuss what the different words or phrases in that main idea mean and annotate. Step back and summarize what the main idea means using the annotations as support.
- Discuss the main ideas in a photograph. This eases the cognitive load for students.
- Identify the character traits of historical figures. This is a super easy way to help students think about main ideas in sources on history.
Hope this helps.
Sunday